pwnRF - STM32WL55
Motivation
After my attendance at the Embedded World 2021 conference in March and an insightful conversation with several engineers from STMicroelectronics, I was offered some of their development boards to play around with. One of those boards was a Nucleo-64 development board with STM32WL55 SoC.
The STM32WL55 SoC contains a dual-core processor, a powerful ARM Cortex M4 and a smaller, less powerful ARM Cortex M0+. While its dual-core capabilities are impressive, its unique selling point is the built-in sub-GHz radio transceiver. It’s able to transmit in a wide range of frequencies, with a variety of different modulation techniques. It can use:
- LoRa modulation,
- (Gaussian) Frequency Shift Keying (GFSK) for a custom communication protocol, or the already existing Sigfox and MBus Wireless protocols,
- (Gaussian) Minimum Shift Keying (GMSK) for custom communication protocols and
- Binary Phase Shift Keying (BPSK) for use with Sigfox or a custom protocol.
- Note that BPSK modulation can only be used for transmitting data
pwnRF
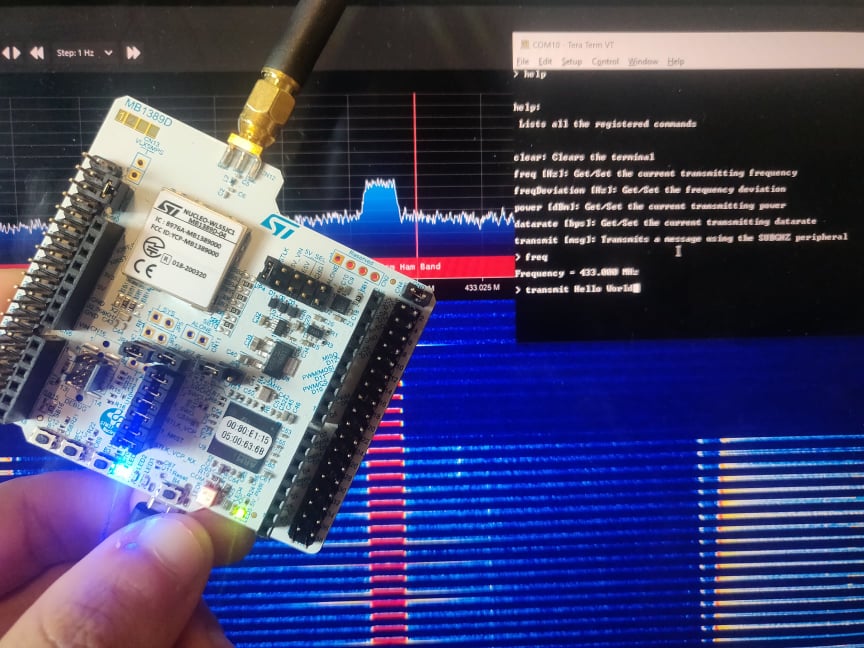
After hearing about all these features I decided to start a new open-source project that I called pwnRF. In its simplest form pwnRF is the combination of the STM32WL55 and firmware that allows easy use of the on-chip SubGhz transceiver, using a simple UART terminal-like application. At the point of writing the features are limited.
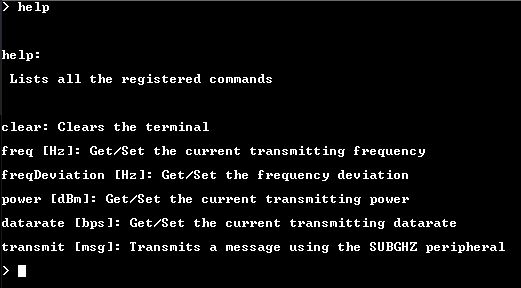
As you can see from the help prompt on the device the options are limited to switching the frequency, frequency deviation, transmit power, and datarate, only with FSK modulation.
Creating and Configuring a UART Console
I created the UART console shown above using the command line library from FreeRTOS-Plus [https://www.freertos.org/FreeRTOS-Plus/FreeRTOS_Plus_CLI/FreeRTOS_Plus_Command_Line_Interface.html]. I was quite supprise at the tool as it was very simple and quite powerful but had very limited online exposure. So to avoid that for anyone else wanting to use this I will quickly run down a few simple steps for integrating UART on STM32 with this library. At this point I will assume you are using the STM32CubeIDE, but the process should be transferable to other IDEs. This method also requires the use of FreeRTOS.
Downloading and Adding the FreeRTOS-Plus-CLI to your Project
I downloaded the source files from the official FreeRTOS website (here) and extracted the folder FreeRTOS-Plus/Source/FreeRTOS-Plus-CLI from the zip into my project directory. I placed it under Middlewares/Third_Party.
Then under my project properties C/C++ General -> Path and Symbols -> Includes, I added the Middlewares/Third_Party/FreeRTOS-Plus-CLI directory to the list. This just told the compiler to use the header files in that directory during compilation.
Note if you place the folder in a different directory you may need to add it to the
Source Locationmenu.
Configuring the FreeRTOS Command Line
Because this is a FreeRTOS product I added the one configuration define it needed in the FreeRTOSConfig.h file. I added the following. I set the max output size to 1 because we will create our own buffer later on for printing the data to the screen and don’t want this one to take up much space in the RAM.
#define configCOMMAND_INT_MAX_OUTPUT_SIZE 1
Adding commands is extremely simple. There are only 3 things you have to worry about:
- The command struct definition,
- The callback when the command is called and,
- Registering the command into the library.
The definition of the command structure is shown below. Each command must have a structure associated with it. Here you have to provide the actual command you want, a string that will appear when you type in the help command, a callback function and the number of expected parameters the callback expects. When a command takes a variable number of parameters just enter -1 for that field.
typedef struct xCOMMAND_LINE_INPUT
{
	const char * const pcCommand;				/* The command that causes pxCommandInterpreter to be executed.  For example "help".  Must be all lower case. */
	const char * const pcHelpString;			/* String that describes how to use the command.  Should start with the command itself, and end with "\r\n".  For example "help: Returns a list of all the commands\r\n". */
	const pdCOMMAND_LINE_CALLBACK pxCommandInterpreter;	/* A pointer to the callback function that will return the output generated by the command. */
	int8_t cExpectedNumberOfParameters;			/* Commands expect a fixed number of parameters, which may be zero. */
} CLI_Command_Definition_t;
Next on you have to define the callback function whose prototype is shown below. The main function of the callbacks are to populate the pcWriteBuffer with the data that we need to output to the console. For getting any potential parameters you can use the const uint8_t *FreeRTOS_CLIGetParameter(const int8_t *pcCommandString, uint8_t ucWantedParameter, uint8_t *pucParameterStringLength ). I won’t go into that right now but the callbacks can be called multiple times per command to print a multilined output. All you have to know now is that to make sure it executes only once return pdFALSE at the end. For more information on this see the official documentation.
static BaseType_t commandCallback(char *pcWriteBuffer, size_t xWriteBufferLen, const char *pcCommandString);
The final thing you have to do is register the command with the library by simply writing FreeRTOS_CLIRegisterCommand(&<commandStruct>.
Interacing the Command Line Library with the UART Peripheral
For this and the above configurations I created a new set of .h/.c files. The CubeMX configuration was very basic with the only modification to the defaults being enabling the UART interrupt under the NVIC tab.
Then following the code generation I redefined the weak HAL_UART_RxCpltCallback function to process any received data. The code is shown below. This function just takes the received byte and adds it into a longer buffer, in which when it detect a “\r\n” in this order puts the data from the buffer into a FreeRTOS Queue. Make sure to restart the asyncronous UART receive after each interrupt so the callback can get executed again.
void HAL_UART_RxCpltCallback(UART_HandleTypeDef *huart) {
	/* Add Byte to long buffer */
	if (cliByteRecved == '\b' && recvBufSize != 0) {
		recvBufSize--;
		recvBuf[recvBufSize] = 0;
		HAL_UART_Transmit(&huart2, (uint8_t *) "\b", 1, 10);
	} else {
		HAL_UART_Transmit(&huart2, &cliByteRecved, 1, 10);
		recvBuf[recvBufSize] = cliByteRecved;
		recvBufSize++;
	}

	/* Check if we got \r\n */
	if (recvBufSize != 0 && recvBuf[recvBufSize - 2] == '\r' && recvBuf[recvBufSize - 1] == '\n') {
		/* Add Message to Queue */
		recvBuf[recvBufSize - 1] = 0;
		recvBuf[recvBufSize - 2] = 0;
		osMessageQueuePut(cliQueue, &recvBuf, 0, 0);
		memset(recvBuf, 0, CLI_BUF_SIZE);
		recvBufSize = 0;
	}

	/* Buffer run out */
	if (recvBufSize == CLI_BUF_SIZE) {
		memset(recvBuf, 0, CLI_BUF_SIZE);
		recvBufSize = 0;
	}

	HAL_UART_Receive_IT(&huart2, &cliByteRecved, 1);
}
A FreeRTOS task was also created that took messages from the Queue and passed them through the FreeRTOS Plus CLI library. Once again the code was relatively straightforward to implement. Once a command is added into the queue it passes it through the FreeRTOS_CLIProcessCommand function to get and print the output. As I said before there are cases where a callback returns multiple times to print multiple lines on the console. So while the function returns pdTRUE we keep excecuting the process function and printing the output.
static void cliTask (void *argument) {
	static char rxdata[CLI_BUF_SIZE];
	static char txdata[CLI_BUF_SIZE];

	HAL_UART_Transmit(&huart2, (uint8_t *) "> ", 2, 10);
	HAL_UART_Receive_IT(&huart2, &cliByteRecved, 1);

	for (;;) {
		if (osMessageQueueGet(cliQueue, rxdata, 0, osWaitForever) == osOK) {
			/* Received Command */
			static uint8_t moreData;

			do {
				moreData = FreeRTOS_CLIProcessCommand(rxdata, txdata, CLI_BUF_SIZE);

				responseSent = 0;
				HAL_UART_Transmit_IT(&huart2, (uint8_t *) txdata, strlen(txdata));

				while (!responseSent);
			} while (moreData != pdFALSE);

			HAL_UART_Transmit(&huart2, (uint8_t *) "> ", 2, 10);
		}

		osDelay(10);
	}
}
Using the SUBGHZ Transceiver
The second major part of this project is the SUBGHZ transceiver built into the STM32WL IC. Unlike the FreeRTOS-Plus-CLI library this is mostly only applicable on this microcontroller.
CubeMX Configuration
In CubeMX I started by enabling the SUBGHZ peripheral and setting the Baudrate Prescaler Value to 4. Then under the Middleware tab I enabled the SUBGHZ_PHY middleware and in the Platform Settings changed the SW CTRL pins to the appropriate ones on the Nucleo.

This was more or less the required configuration in CubeMX. Note, if you are not using FreeRTOS an error will pop up when compiling on the RADIO_INIT macro. When that comes up just delete from the code as it is not needed because the initialization is already done in main.c.
Configuring the Radio
Now that the hardware is configured we will have to configure the software. I’ve done this in the subghz_phy_app.c file in the SubGHz_Phy/App directory. There the middleware made it extremely easy to configure the Radio with only a few commands.
Radio.SetChannel( uint32_t freq ): Sets the transmission frequencyRadio.SetTxConfig: It configure all of the Tx parameters. It’s prototype is shown below
SetTxConfig(RadioModems_t modem, int8_t power, uint32_t fdev,
			uint32_t bandwidth, uint32_t datarate,
            uint8_t coderate, uint16_t preambleLen,
            bool fixLen, bool crcOn, bool freqHopOn,
            uint8_t hopPeriod, bool iqInverted, uint32_t timeout );`
Radio.SetMaxPayloadLengh( RadioModems_t modem, uint8_t max ): Sets the maximum payload length. Note that the max is only 55 bytes This 255 byte are shared between Rx and Tx.
You can see my code here to get an idea of possible values for the parameters.
Conclusion
It is clear the the STM32WL series of microcontrollers is great step forward in terms of microcontrollers. I’m looking forward to further develop my pwnRF project and hopefully make it into a custom PCB with more features.